I decide to build a boombox with the following goals/features:
- Bluetooth connectivity (preferably v4.0 or later).
- High fidelity audio with good power and punchy bass.
- Portability dictates the need for (rechargeable) battery power with decent battery life with a max. weight of 15 pounds.
Bill of Materials
- I had an old pair of MB Quart car speakers lying around. Despite being about 25 years old, these are fantastic speakers that were used for mid to high-range audio that were previously installed in my first ever car - so there's plenty of memories and nostalgia attached to wanting to hear them perform again. The speaker is actually a two-way speaker with the tweeter mounted directly over the cone of the 6.5 inch woofers. This is useful because it is very compact and it means I don't need to worry about separately cutting holes for and mounting the tweeters into the boombox enclosure. Each speaker comes with a separate crossover which contains low and high-pass filters which separate the audio input to the woofer and tweeter respectively. The speakers are rated at 70 watts (rms) which means that they are loud enough to drive the neighbors mad!
- After some research, I found the TDA7492P 50W + 50W which costs only $15, but takes a few weeks (about three weeks) to ship from China. This is an incredible little amplifier which can be powered using a 8-25V DC supply and which covers all the requirements. First off, it is a Class D amplifier capable of delivering up to 50W of power (rms) per channel. This is an amazing amount of power from such a small amp and because it is a class D amplifier (with an efficiency > 93%) it can be powered by battery for a long time and generates almost no heat while in operation. Second, it contains a Bluetooth v4.0 module built-in and includes function buttons (play/stop, last, next, volume) which allow one to remotely control the music player from the amplifiers (if so desired). Some versions of this amplifier also contain a line-in socket for a 3.5mm jack (not used in this project). Third, this amp is TINY measuring only 82mm x 50mm x 19mm (or 3.2'' x 2.0'' x 0.8'') and thus can be contained and hidden within the boombox enclosure.

- Initially the boombox will be powered using a wall-wart power supply which I had lying around. This supply delivers 18V DC at up to 2 A (which means it can deliver up to 18V x 2A = 36W of power). SPOILER ALERT: This is way less than the 100W total that the amp can handle, but will be more than enough (way, way more) for now!! Eventually, I will be building a rechargeable battery pack (which will likely use a different power supply) which will be capable of continuously supplying 15V at 6A = 90W. For this purpose, I will use 4 x NCR18650 Li-Ion cells to build the battery pack. These cells, which are roughly the size of a AA battery, run about $5 each and are rated at a voltage of 3.6V and are rated at a capacity of 3,400mAh (wow!!). They are also rated for continuous discharge at 2C = 6.8A which means that each cell can deliver 24.5 watts of power continuously for 30 mins. For listening at levels where most people would likely listen, the battery should last hours. Additionally, due to the small size of the battery back, a second could be easily added in parallel which would double the battery life.
- For the construction of the boombox, I used 1/2-inch thick medium density fiber (MDF) board. MDF is commonly used to build speaker enclosures, but usually in a 3/4-inch thickness. I chose the keep the weight down using 1/2'' MDF, but great care needed to be taken so as not to split the MDF when drilling and screwing into its edge. For about $20, I got a sheet of 24'' x 48'' x 1/2'' MDF board which was more than enough material than was needed, but this way I have some scrap pieces for my next project.
- The only tools I used were a circular saw, a jigsaw, a palm sander, drill bits, glue, screws, clamps and spray paint - all of which I already had lying around my garage.

Costs
The cost of this project for me was inexpensive. I already had the speakers (which saved me probably $100 to $200. So, the only cost to me was $15 for the amp plus another $20 for the MDF board plus some accessories (like spray paint) - so perhaps $40 to $50 total. The rechargeable battery pack will cost another $30.I have seen and heard various assorted Bluetooth speakers that cost hundreds of dollars and they don't produce either the anything close to the quality and fullness of audio that this boombox can output - not to mention the fact that this boombox will drown out all those others when the volume is raised.
Boombox Enclosure Design
 Human ears can detect audio in the 20 Hz to 20 kHz range with the human, however, most speakers can deliver audio over a portion of the range. The MB Quart speakers that I am using tend to reproduce audio very well in the 100 Hz to 6 kHz range. When used without an enclosure, the low end of the range (ie the bass) is noticeably absent. The idea is that by designing a bass reflex enclosure to house the speaker and augment its bass response, the enclosure/speaker combination is able to reproduce a wider (and better sounding) audio range than what the speaker alone is able to. The bass reflex enclosure produces sound in much the same way as blowing air over the top of an empty bottle (or a flute) and by carefully selecting appropriate dimensions for the enclosure, the enclosure is tuned for a (resonant) frequency of around 72 Hz. Additionally, the enclosure resonance limits the cone movement to within a range of frequencies centered around the tuning frequency thereby reducing distortion in that frequency range. Generally speaking, the larger the volume of the speaker enclosure, the lower the bass reflex resonant frequency (ie the lower we can extend the lower on of the speaker's audio range). Due to the desire to tune the bass reflex enclosure for well below 100 Hz (the lower range of the speaker) AND due to the desire to keep the enclosure as small as possible, an off-axis design was selected for the bass reflex enclosure. The off-axis description refers to the fact that the port opening is perpendicular to the speaker axis (ie the port is on the side of the enclosure and not the back or front as shown in the figure below). Such a design will reproduce a response below the range that is achievable with a similarly sized sealed box.
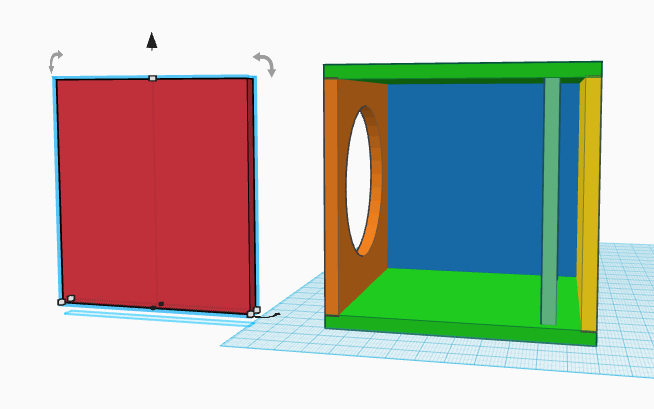
 For the purpose of determining the dimensions of the enclosure, I used the known speaker properties and an online calculator. Once the enclosure's dimensions had been optimized for size and resonant frequency, the width of the boombox was doubled in order to accommodate two identical enclosures (actually mirror images) side-by-side. The enclosure was the lengthened by an additional 2 inches in order to build in a compartment within the speaker to house the amplifier, speaker crossovers and battery so as not to interfere with the bass reflex enclosures when installing these components.
 This is a spreadsheet showing the final dimensions of the boombox design which was then drawn up and rendered using Tinkercad. The coloring of the various pieces in the rendering allowed me to track the dimensions for each piece and proved to be very useful for cutting.


Construction
 I began with all the cutting which was facilitates by having the guy at the store rip the large MDF board into 19-inch strips. This provided a nice, straight edge on these pieces and made is easy for me to transport. The rest I finished up at home with my circular saw and a cutting guide. The tolerances were pretty good. The boombox was constructed by gluing, screwing and clamping the pieces together (although initially I left the top and back panels unglued as I knew I'd be removing them many times as I improved things). The better the enclosure is sealed, the better the sound and so a bead of silicone sealant was run long each inside edge of the enclosure. Gluing and sealing is a must as it prevents any resonant rattling on the enclosure - the booxbox is supposed to BOOM not rattle. In some cases, inserting the screws caused the MDF board to split slightly in places despite pre-drilling the screw holes. The splits were glued back together and clamped until dry. The speaker holes were drawn using a compass and cut out with a jig saw. The holes should be just large enough to accommodate the speakers - DO NOT OVERCUT THE HOLES! You can always remove more material, but you cannot add it back. You want a snug fit in order to help the speakers to seal the enclosure when mounted. After sanding and painting, the boombox enclosure is ready for the electronics to be added.
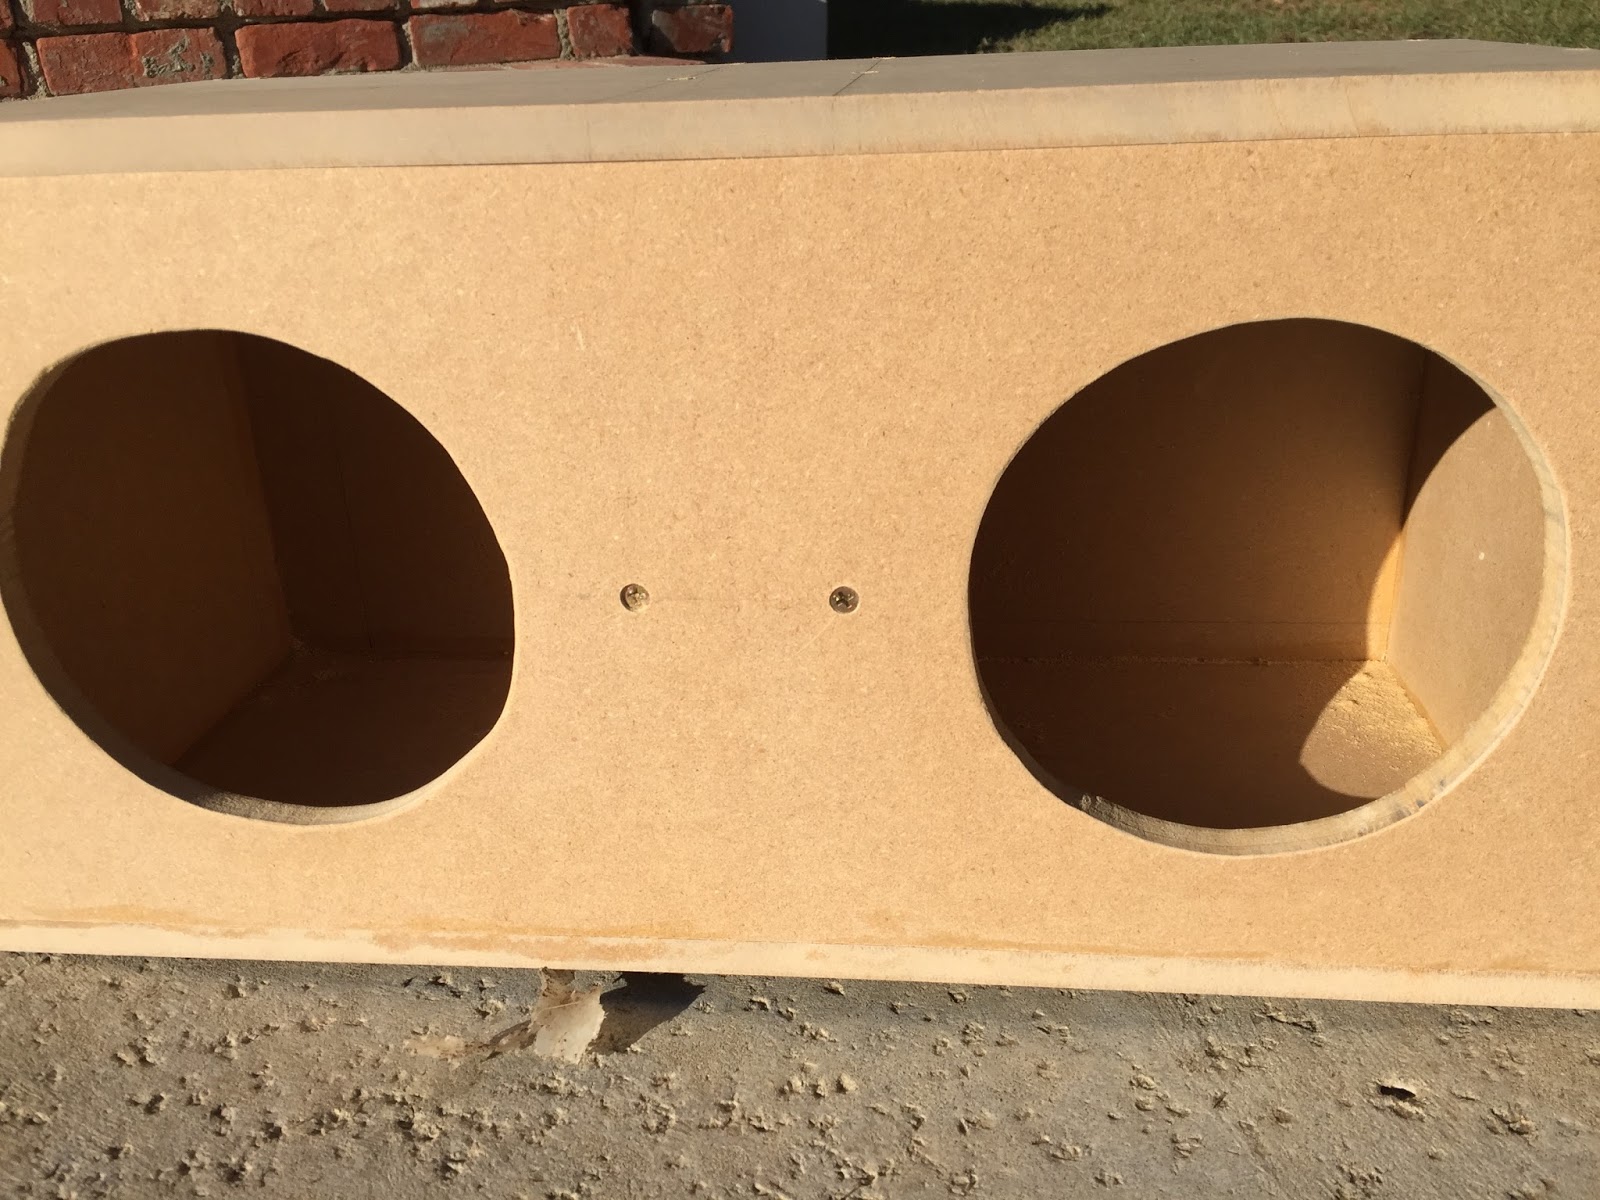 The crossovers, amplifier and power supply were hot glued in place in the center enclosure with a hole drilled in the back to allow the power cable to pass through. Holes were drilled to allow the speaker wire from the crossovers to pass into the speaker enclosures and were then sealed with silicone. The speaker enclosures were filled with the polyester sound-damping filler, the speakers were wired and mounted and voila!

Rechargeable Battery Pack - FTW!
 In order to make the boombox truly portable, I decided to build a rechargeable battery pack using Li-ion batteries. These are the sort that you might find in a cell phone or laptop or a Tesla electric car. Each cell carries a nominal rating of 3.7V but will range from 2.5V at the low end (fully depleted) to 4.2V at the high end (fully charged). For improved durability of the battery, it should not
 be held near either end of this range for extended periods. To assist with this, a battery protection circuit is used. This will keep the battery pack balance and will disconnect the battery pack if it detects an under-voltage or over-voltage on any of the cells.
A good, conservative rule-of-thumb for recharging a battery pack is to hold at at a voltage of 4.2V per cell (so in this case 4 x 4.2V = 16.8V) while providing 1A of current. For this purpose, I bought the following power supply. This is find for recharging the battery pack while the boombox is powered off, however, if I wanted to be able to run the boombox using either power or battery, then I needed something more with a little more juice. Li-ion cells can be safely charged at 1C (many seem to suggest that 2C is fine continuously - even 3C once in a while is not terrible). For a 3,000mAh, this would mean that they can be safely recharged at 3 amps. For now, I just stuck in out with the 1 amp charger. Since the battery lasts so long, I seldom need to charge it and just do it when I'm not playing music.
IMPORTANT NOTE: The power wires between the power supply / battery and the amplifier need to be sufficiently thick - this amp is much less puny than it looks! If the wires are too thin then at louder volume levels, the audio will begin to distort badly as the amplifier is starved of power.
Building the battery pack is pretty simple. Hot glue the batteries together and connect them in series by soldering nickel connector tabs between the appropriate terminals of each cell. Then connect the battery protection circuit in accordance with its instructions. In my case, the PCB for the protection circuit was a little longer than the battery pack which added to its overall size. If I were doing this again, I'd go with a different (smaller) option. Once completed, I painted all the conductive parts with liquid insulation tape/paint - including most of the PCB for the battery protection circuit. This will be enclosed within the boombox anyway so I don't care too much about how it looks, but I do case that about not short-circuiting anything.


